Grandma Barb’s Southern Buttermilk Biscuits
Grandma Barb’s Southern Buttermilk Biscuits: The Ultimate Comfort Food Recipe
Do you ever find yourself longing for those perfectly baked biscuits, the kind that are so impossibly light and airy they almost seem to defy gravity? We’re talking about the ones with countless buttery, flaky layers that peel apart effortlessly, releasing a warm, comforting cloud of steam. For us, that image is deeply rooted in memories of a grandmother’s kitchen, a place of warmth, affection, and the soul-soothing scent of freshly baked goods. If you’ve been searching for that experience, your journey ends today. We’re delighted to share our most cherished family heirloom: the authentic recipe for Grandma Barb’s Southern Buttermilk Biscuits. This is far more than a simple recipe; it’s an invitation to recreate those precious moments and forge new ones with your own loved ones.
This is not your average homemade bread recipe; it is a true testament to the beauty of simple ingredients and precise technique. With just a handful of kitchen staples and the know-how that we’re about to share with you, you’ll soon be pulling a tray of the most tender, sky-high biscuits from your oven. It’s time to say goodbye to disappointing, heavy biscuits and hello to mastering the art of the quintessential Southern delight.
Why You’ll Love This Recipe
- Incredibly Fluffy and Tender: The magical reaction between ice-cold butter and tangy buttermilk gives rise to an exceptionally soft texture, creating dozens of delicate, buttery layers.
- Simple, Everyday Ingredients: There’s no need for a special shopping trip; you probably have all the necessary components in your pantry and fridge already.
- Ready in Under 30 Minutes: This recipe comes together astonishingly quickly. From the first measurement to the final bake, you can have warm biscuits on the table in less than half an hour.
- A Taste of Tradition: As an authentic recipe passed down through generations, it captures the very essence of classic comfort food and delivers a flavour that feels just like coming home.
- Amazingly Versatile: They are perfect served warm with a slather of butter and jam, used as the foundation for breakfast sandwiches, or offered alongside a comforting stew.
Ingredients
- 250g (2 cups) Plain Flour, plus extra for dusting
- 1 tbsp Caster Sugar
- 2 ½ tsp Baking Powder
- ½ tsp Bicarbonate of Soda
- 1 tsp Fine Sea Salt
- 115g (½ cup) Unsalted Butter, very cold and cubed
- 180ml (¾ cup) Cold Buttermilk, full-fat is best
- 1 tbsp Melted Butter, for brushing (optional)
The Essential Steps to Perfecting Grandma Barb’s Biscuits
Crafting outstanding biscuits is less about the ingredients and more about the method. Though the list is short, the real magic lies in *how* everything is combined. We are here to guide you through each part of the process, ensuring you achieve those sought-after flaky layers with every batch. It’s much simpler than you might imagine!
Step 1: Prepare Your Station
To begin, getting everything in order is paramount. A well-organised workspace not only makes baking more pleasant but also yields superior results.
- Preheat the Oven: Set your oven to 220°C (200°C Fan / 425°F / Gas Mark 7). A piping hot oven is vital for the initial “oven spring,” which helps the biscuits rise impressively tall.
- Line Your Baking Tray: Place a sheet of parchment paper on a sturdy baking tray. This ensures the biscuits won’t stick and makes cleaning up afterwards incredibly easy.
- Chill Your Ingredients: Ensure your butter is diced and placed back in the freezer for at least 10 minutes before you begin. The buttermilk should be used straight from the fridge. Using cold ingredients is the non-negotiable secret to tender biscuits!
Step 2: Mixing and Cutting the Dough
This is the stage where we create the structure for our fluffy buttermilk biscuits. Always remember the most important rule: handle the dough as minimally as possible.
- Combine Dry Ingredients: In a large bowl, whisk together the plain flour, caster sugar, baking powder, bicarbonate of soda, and salt. This step helps to aerate the flour and evenly distribute the raising agents.
- Cut in the Butter: Add the chilled, cubed butter to your dry mix. Using your fingertips or a pastry blender, work the butter into the flour swiftly until you have a texture like coarse breadcrumbs, with some pea-sized butter pieces remaining. Speed is key to prevent the butter from warming up. These small pockets of butter will create steam in the oven, which is what makes the biscuits so flaky.
- Add the Buttermilk: Pour in all the cold buttermilk at once. With a fork or spatula, gently stir until a shaggy, slightly sticky dough just comes together. Do not be tempted to overmix; a few dry spots are perfectly fine.
- Fold for Flaky Layers: Turn the dough out onto a lightly floured surface. Gently pat it into a rough rectangle, about 2cm (¾ inch) thick. Now for the layer-making secret: fold the dough into thirds, as you would a business letter. Give the dough a 90-degree turn and pat it out again. Repeat this folding and turning process twice more. This lamination technique creates countless thin layers of butter and dough.
- Cut the Biscuits: Following the final fold, pat the dough out to a thickness of around 2.5cm (1 inch). Take a 6cm (2.5-inch) biscuit cutter and press it straight down into the dough. It’s crucial not to twist the cutter, as this can seal the edges and prevent a good rise. Gather the remaining scraps, press them together gently (without kneading), and cut out more biscuits.
Step 3: Baking to Golden Perfection
You’re almost there! In just a short while, your home will be filled with the most incredible, comforting aroma.
- Arrange on the Tray: Position the cut biscuits on your prepared tray. If you prefer biscuits with soft, fluffy sides that pull apart, place them close enough so their edges are just touching. For biscuits with slightly crispier sides, leave a gap of 2-3cm between them.
- Brush and Bake: For a deeper golden hue on top, you can lightly brush the biscuits with a little more buttermilk or some melted butter.
- Bake for 12–15 minutes, or until they have risen majestically and are a beautiful golden-brown colour.
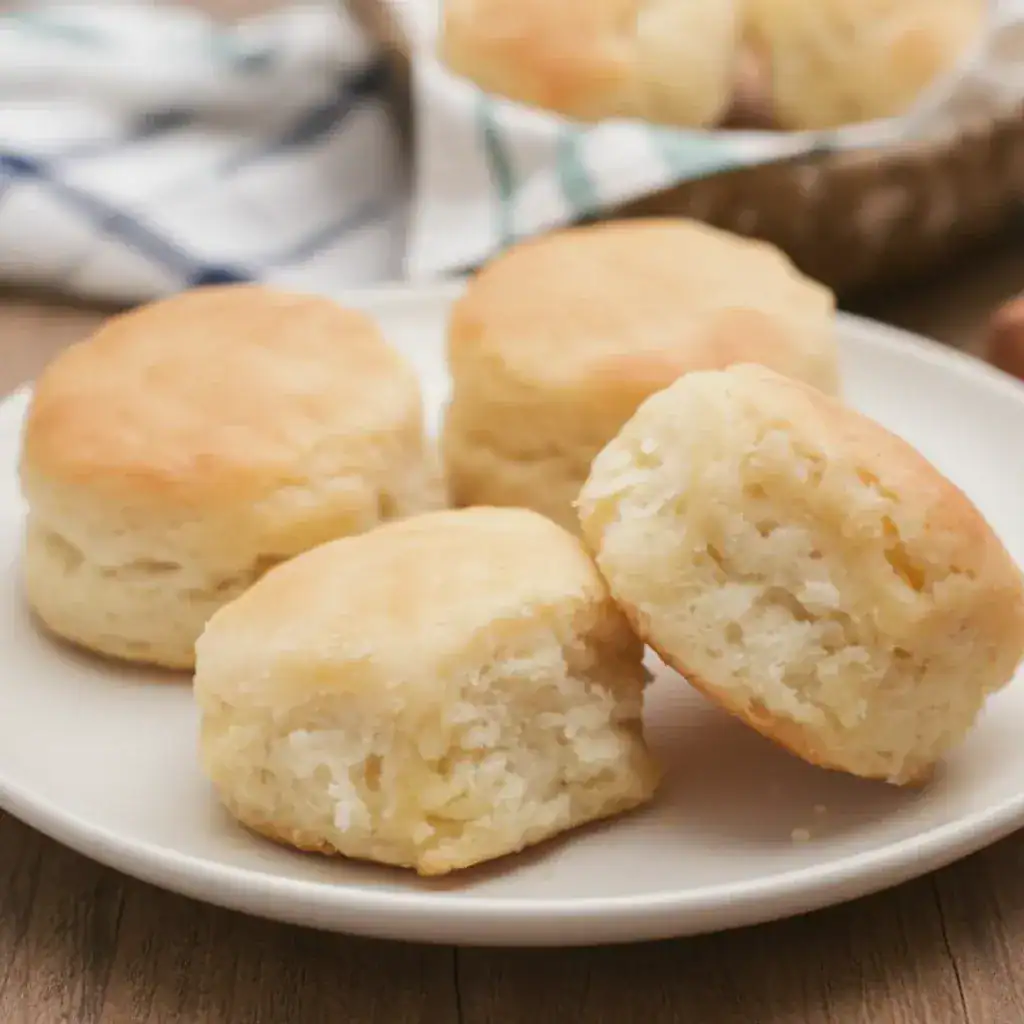
- Serve Warm: There is simply no better way to enjoy Grandma Barb’s Southern Buttermilk Biscuits than fresh from the oven, generously topped with butter, honey, or your favourite preserve.
Serving Suggestions for Traditional Southern Biscuits
These biscuits offer a versatile base for countless delicious meals. While they are spectacular on their own, the right pairing can elevate them to another level. They are the ideal accompaniment for soaking up rich gravy or sauce. We particularly enjoy serving them with main dishes like our Baked Ranch Chicken for a simple yet deeply satisfying family meal.
For an iconic Southern pairing, nothing compares to classic biscuits and gravy. But their potential doesn’t end there! They create a superb foundation for breakfast sandwiches with egg, cheese, and sausage. They also make a wonderful side for a hearty bowl of soup or chilli. For a meal that strikes a perfect balance of sweet and savoury, try them with our delightful Baked Hot Honey Chicken; the flaky biscuits are perfect for savouring every last bit of that delicious sauce.
Top Tips from Grandma Barb’s Kitchen
Through the years, we’ve come to rely on a few golden rules for making the very best traditional southern biscuits. If you follow this advice, success is guaranteed.
- COLD, COLD, COLD: We simply cannot overstate this. Your butter must be cold, your buttermilk must be cold, and even using a chilled bowl helps. When those cold butter pockets meet the high heat of the oven, they release steam, which forces the dough upwards to create those beautiful, flaky layers. To better understand the science, King Arthur Baking has a great explanation on why cold butter is so crucial.
- Be Gentle: Overworking biscuit dough develops gluten, which is desirable for chewy bread but results in tough, disappointing biscuits. Mix only until the ingredients are just incorporated and handle the dough as sparingly as possible.
- Don’t Twist the Cutter: When cutting your biscuits, press the cutter straight down and lift it straight back up. Twisting the cutter seals the dough’s edges, which stops it from rising to its full, impressive height in the oven.
- Check Your Leavening Agents: Baking powder and bicarbonate of soda can lose their effectiveness over time. To ensure your biscuits get the best possible lift, always check that your raising agents are fresh and within their use-by date.
Can We Make Healthy Buttermilk Biscuits?
While these biscuits are certainly a delightful indulgence, you can make a few minor adjustments if you’re aiming for a slightly more Healthy Buttermilk Biscuits version. Consider substituting up to half of the plain flour with white whole-wheat flour to increase the fibre content. This will create a denser, nuttier biscuit, but one that is still very tasty. You could also opt for a lower-fat buttermilk, although we find that full-fat provides the richest taste and the most tender result. In the end, we believe the best way is to enjoy these wonderful biscuits just as they are, in moderation, as a special and well-earned treat.
FAQ
A Tradition Worth Sharing
This recipe for Grandma Barb’s Southern Buttermilk Biscuits represents so much more than words on a screen; it is a link to our family’s history, a taste of home, and a wonderful skill that will bring warmth and happiness to your kitchen for many years. It’s amazing how the simple process of mixing flour and butter can result in something so magical, filling your home with an aroma that speaks of pure comfort and love.
Now, we invite you to carry on this tradition. Get your ingredients ready, switch on your oven, and prepare to create the most delicious biscuits you’ve ever had. We are so excited for you to try them. Please let us know how you get on! Feel free to leave a comment and a star rating below, and we would love it if you shared a picture of your beautiful biscuit creations with us on social media. Happy baking!
Recipe Card

Ingredients
- 250g (2 cups) Plain Flour, plus extra for dusting
- 1 tbsp Caster Sugar
- 2 ½ tsp Baking Powder
- ½ tsp Bicarbonate of Soda
- 1 tsp Fine Sea Salt
- 115g (½ cup) Unsalted Butter, very cold and cubed
- 180ml (¾ cup) Cold Buttermilk, full-fat is best
- 1 tbsp Melted Butter, for brushing (optional)
Instructions
- Preheat oven to 220°C (200°C Fan / 425°F / Gas Mark 7). Line a baking tray with parchment paper.
- In a large bowl, whisk together the flour, sugar, baking powder, bicarbonate of soda, and salt.
- Cut the very cold, cubed butter into the flour mixture using a pastry blender or your fingertips until it resembles coarse breadcrumbs with some pea-sized pieces of butter remaining.
- Pour in the cold buttermilk and stir with a fork until a shaggy, slightly sticky dough just comes together. Be careful not to overmix.
- Turn the dough onto a lightly floured surface and gently pat it into a rectangle. Fold the dough into thirds, like a business letter. Turn the dough 90 degrees and repeat the folding process twice more.
- Pat the dough out to a final thickness of about 2.5cm (1 inch). Using a 6cm (2.5-inch) round cutter, press straight down into the dough to cut out biscuits. Do not twist the cutter.
- Place the biscuits on the prepared baking tray. For soft sides, place them so they are just touching. For crispier sides, leave a small gap between them.
- Brush the tops with melted butter (optional) and bake for 12–15 minutes, or until risen and golden-brown. Serve warm.